Build a dApp in 15 minutes
Let's build your first decentralized application (dApp) on the MultiversX Blockchain!
Prerequisites
Before starting this tutorial, make sure you have the following:
stableRust version≥ 1.85.0(install via rustup)multiversx-sc-meta(cargo install multiversx-sc-meta)Node.jswith version≥ 20(guide here)pnpm(npm install --global pnpm )
You are going to use sc-meta to:
- Create a wallet to handle your transactions.
- Build and deploy a contract.
Description
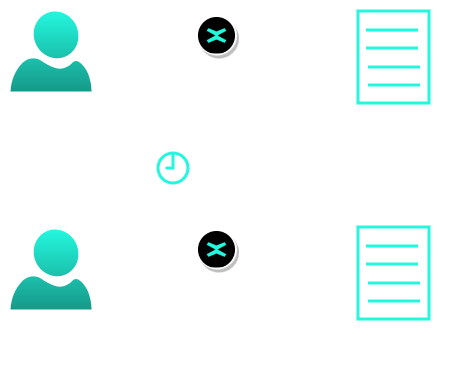
The Ping-Pong app is a very simple decentralized application that allows users to deposit a specific number of tokens to a smart contract address and to lock them for a specific amount of time. After this time interval passes, users can claim back the same amount of tokens.
Endpoints available:
ping: sending funds to the contract;pong: claiming the same amount back.
Rules:
- Each user can only
pingonce before theypong; - The
pingamount must be exactly the specified value - no more, no less; pongbecomes available only after a set waiting period following aping.
Architecture
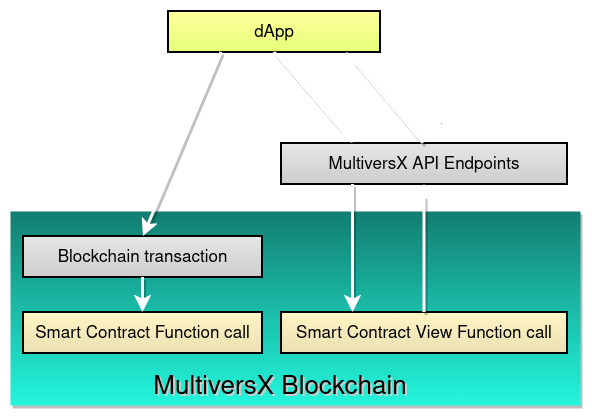
Application Layer - Frontend
For the web application, we will have two pages:
- Sign in - The page where you can authenticate using the xPortal App, Ledger, DeFi Wallet, xAlias, Web Wallet, Passkey Proxy or Metamask Proxy;
- Dashboard - Here, you can either
pingorpong. If you have already deposited, you will see a countdown timer until the time interval resets.
Blockchain Layer - Backend
You will interact with a smart contract that provides the following features:
ping: users send tokens to the contract, locking them for a specific period;pong: users retrieve their funds, but only after the lock period expires.
The contract also includes several views, storage mappers and one event:
didUserPing: view that tells if a specific user has alreadyping-ed (true) or not (false);getPongEnableTimestamp: view that provides the timestamp whenpongwill be available for a given address;getTimeToPong: view that shows the remaining time untilpongis enabled for a specific address;getAcceptedPaymentToken: storage mapper that saves the token type allowed for deposits;getPingAmount: storage mapper that records the total amount of tokens deposited;getDurationTimestamp: storage mapper that saves the lock duration (in milliseconds) beforepongcan be called after aping;getUserPingTimestamp: storage mapper that saves the timestamp of the block where the userping-ed;pongEvent: event that signals a successfulpongby the user with amount.
Think of this smart contract as the API for our dApp, handling all the core business logic.
To test it out, we will use MultiversX Blockchain Devnet Explorer - a public test network maintained by our community.
Set up the environment
Let's set up the environment for getting your first dApp up and running.
Project Structure
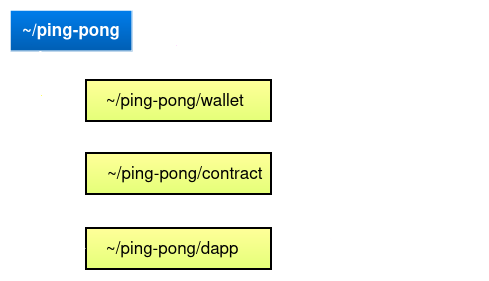
Start by creating a new folder for your project. Let's call it ping-pong.
mkdir -p ping-pong
cd ping-pong/
By the time we are done, our project will have three subfolders: wallet, contract, and dapp.
Create wallet
To deploy a smart contract to the blockchain, you will need a wallet: a PEM file is recommended for simplicity and ease of testing.
Make sure you are in the ping-pong/ folder before continuing.
mkdir -p wallet
sc-meta wallet new --format pem --outfile ./wallet/wallet-owner.pem
PEM wallets are recommended only for testing and experimenting with non-production code. For real applications, always follow best practices and use secure wallets that can be generated here.
To initiate transactions on the blockchain, your wallet needs funds to cover transaction fees, commonly referred to as gas.
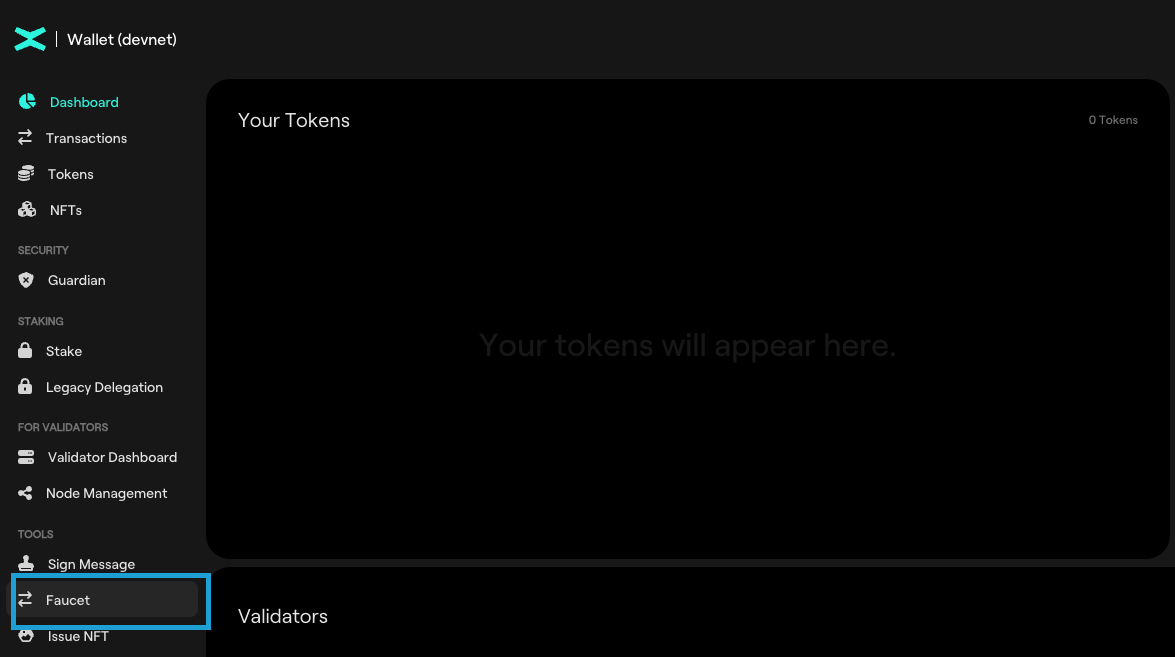
The MultiversX Devnet offers a faucet where you can claim 5 EGLD. You can recall the faucet every 24 hours if your balance is lower than 1 EGLD. Here’s how to fund your wallet:
- Go to Devnet Wallet MultiversX and log in using your newly generated PEM file;
- Once logged in, open the Faucet from the Tools;
- Request 5 xEGLD to top up your wallet with test EGLD.
The Blockchain Layer
With the wallet setup complete, let's move on to the backend - the blockchain layer.
Let's start with the smart contract. You will first clone the Ping-Pong sample contract repository.
Make sure you are still in the ping-pong/ folder.
git clone https://github.com/multiversx/mx-ping-pong-sc contract
This will create a contract folder within ping-pong, containing all the necessary files for the Ping-Pong smart contract.
Build the Smart Contract
Now that you have the source code for the smart contract, you need to compile it into a binary that the MultiversX Virtual Machine (VM) can execute. Since the VM runs Web Assembly (WASM) code, you need to compile our Rust source code into a WASM file.
At path ping-pong/, run the following command to build the smart contract into a WASM file.
cd contract/ping-pong
sc-meta all build
After running the build command, a WASM file will be created at output/ping-pong.wasm.
This file contains the bytecode for the smart contract, ready to be deployed on the blockchain.
Deploy the Smart Contract
Next, let's deploy the smart contract to the blockchain.
Ensure that wallet_owner.pem is in the wallet/ folder and that the smart contract is built.
Before deploying, you will need to modify the wallet from which transactions are made. Currently, they are made from a test wallet. To use the wallet you created earlier, you will need to make the following changes:
In the file interact.rs located at the path ping-pong/contract/ping-pong/interactor/src, the variable wallet_address_1 from new function will be modified.
let wallet_address_1 = interactor.register_wallet(test_wallets::alice()).await;
let wallet_address_1 = interactor
    .register_wallet(Wallet::from_pem_file("../../../wallet/wallet-owner.pem").unwrap())
    .await;
You need to replace with the relative path from the interactor crate to the created wallet.
The interactor crate is located at ping-pong/contract/ping-pong/interactor, and the wallet is in a higher-level directory: ping-pong/wallet.
Alternatively, you can add the absolute path of wallet-owner.pem.
This next command deploys the Ping-Pong contract with the following settings:
- Ping Amount: 1 EGLD.
- Lock Duration: 180000 milliseconds (3 minutes).
Ensure that you run the next command inside the interactor crate, located at:
ping-pong/contract/ping-pong/interactor
cargo run deploy --amount 1000000000000000000 --duration 180000
    Finished `dev` profile [unoptimized + debuginfo] target(s) in 0.48s
     Running `/ping-pong/contract/target/debug/ping-pong-interact deploy --amount 1000000000000000000 --duration 180000`
sender's recalled nonce: 0
-- tx nonce: 0
sc deploy tx hash: 93ff495b02eb84f0f427f4f02e2c0ce10e667a3511807db8781e1eaed47f9d16
deploy address: erd1qqqqqqqqqqqqqpgq0dw0cfqeknm43sxzzeg5h5j3ewwu8gyd0vdqq4jutd
new address: erd1qqqqqqqqqqqqqpgq0dw0cfqeknm43sxzzeg5h5j3ewwu8gyd0vdqq4jutd
Once the command runs, review the log output carefully. Two key details to note:
- Contract Address: in the example presented below, it is erd1qqqqqqqqqqqqqpgq0dw0cfqeknm43sxzzeg5h5j3ewwu8gyd0vdqq4jutd
- Transaction Hash: in the example presented below, it is 93ff495b02eb84f0f427f4f02e2c0ce10e667a3511807db8781e1eaed47f9d16
We will take a look at the transaction details. Let's check them in the Devnet Explorer.
![]()
The Devnet Explorer will be your go-to tool for developing dApps on the MultiversX Blockchain. It allows you to test and monitor your deployments on the Devnet, ensuring everything works as expected.
With the smart contract successfully deployed, you can now interact with it using blockchain transactions to invoke its main functions: ping and pong.
The smart contract source code resides in ping-pong/contract/ping-pong/src/ping_pong.rs.
The contract includes several view functions for querying information. These are invoked using the MultiversX API:
didUserPing;getPongEnableTimestamp;getTimeToPong;getAcceptedPaymentToken;getPingAmount;getDurationTimestamp;getUserPingTimestamp.
The Application Layer
Now that the backend is ready, let’s move on to the application layer!
Set Up the dApp Template
To get started, navigate back to the root ping-pong folder.
Next, clone a simple dApp template that includes the necessary calls to interact with your newly deployed smart contract:
git clone https://github.com/multiversx/mx-template-dapp dapp
cd dapp
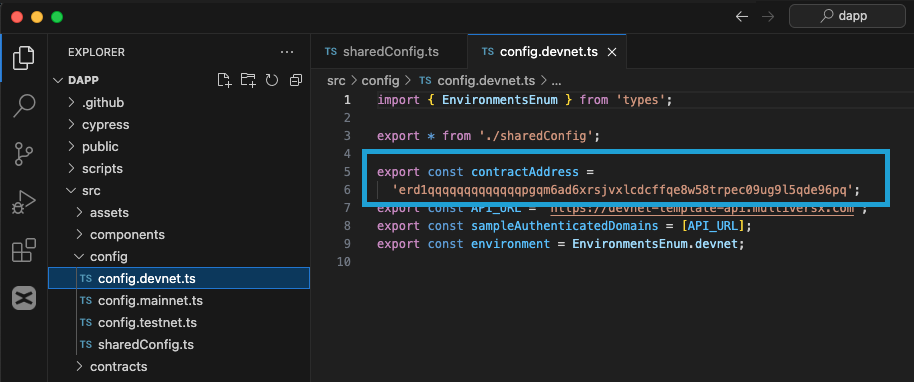
Use the preferred editor and customize the Smart Contract address located in src/config/config.devnet.ts
Then edit this instruction and change it to the contract address that you created in the deploy step.
Navigate to the ping-pong/dapp folder and install the required dependencies:
npm install --global pnpm
pnpm install
Start the Development Server
To test your dApp locally, start a development server with the following command:
pnpm start-devnet
Running and Accessing the dApp
If you run the development server on your local machine, simply open https://localhost:3000 in your browser.
If the server is hosted on a remote machine, access it using the server's IP address, like http://ip:3000.
The production build of the app consists only of static files, so you can deploy it on any hosting platform you prefer.
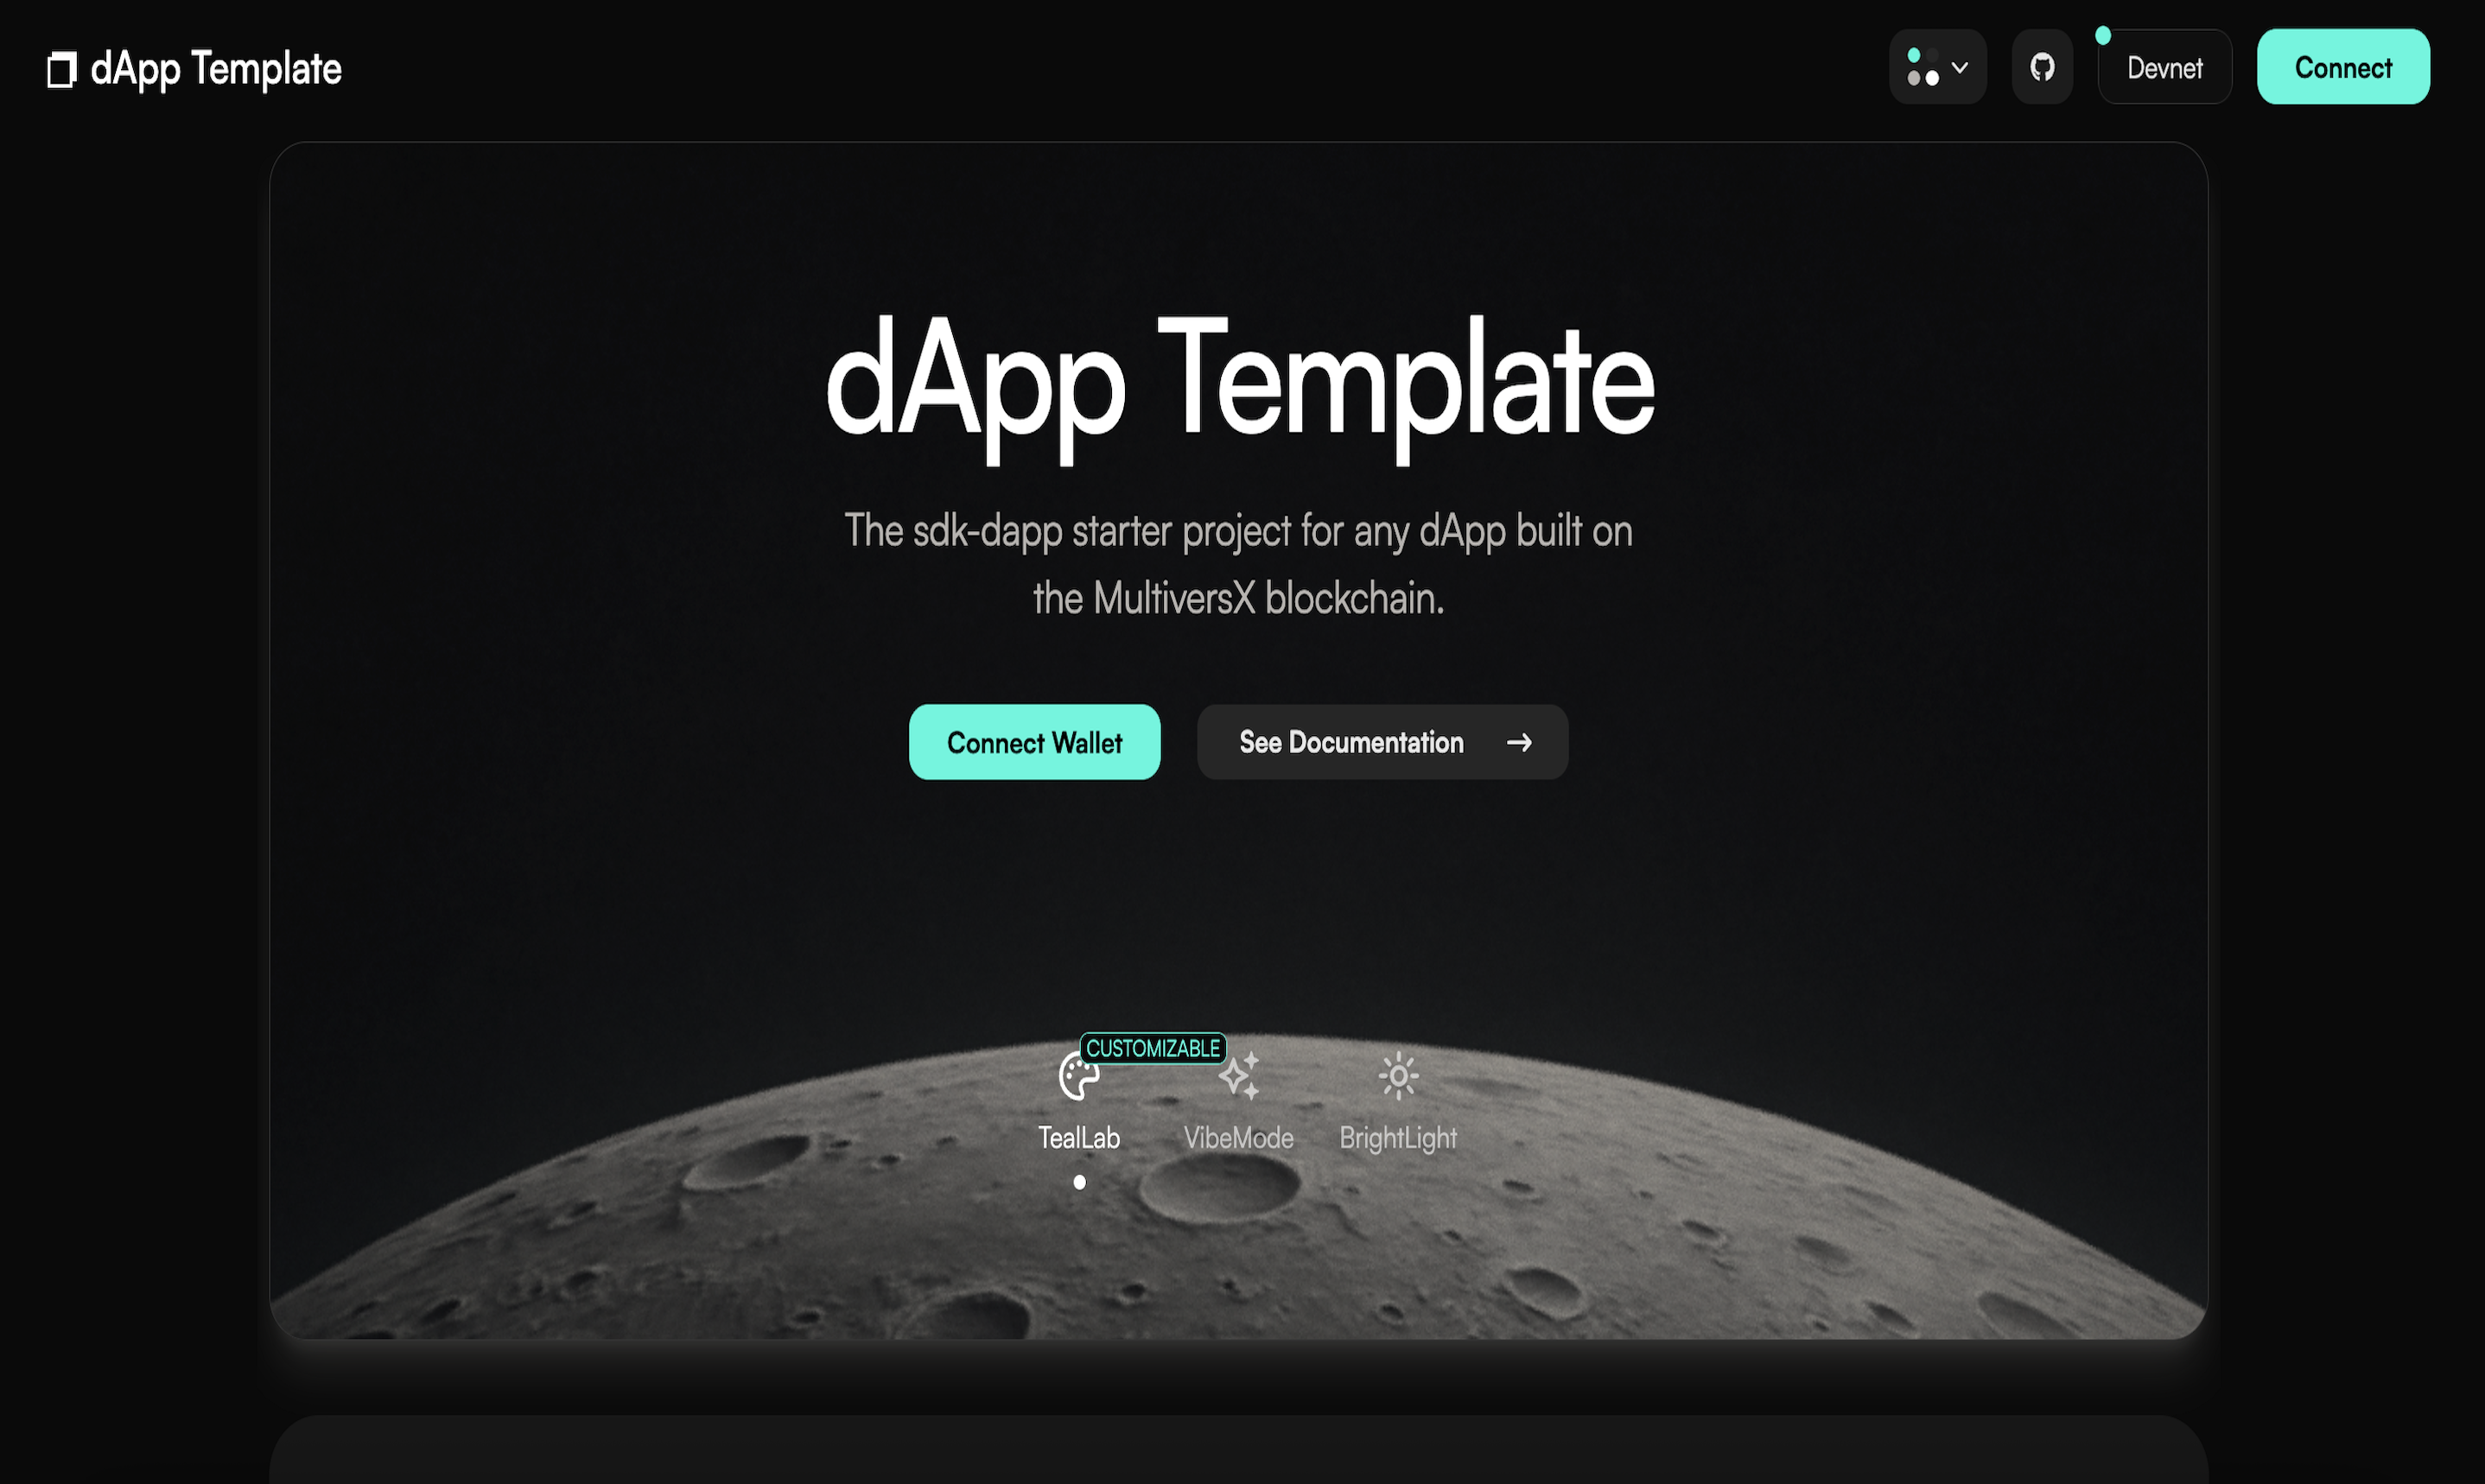
Once the development server is up and running, seeing the Template dApp screen confirms that your application is live and ready!
Try your Application
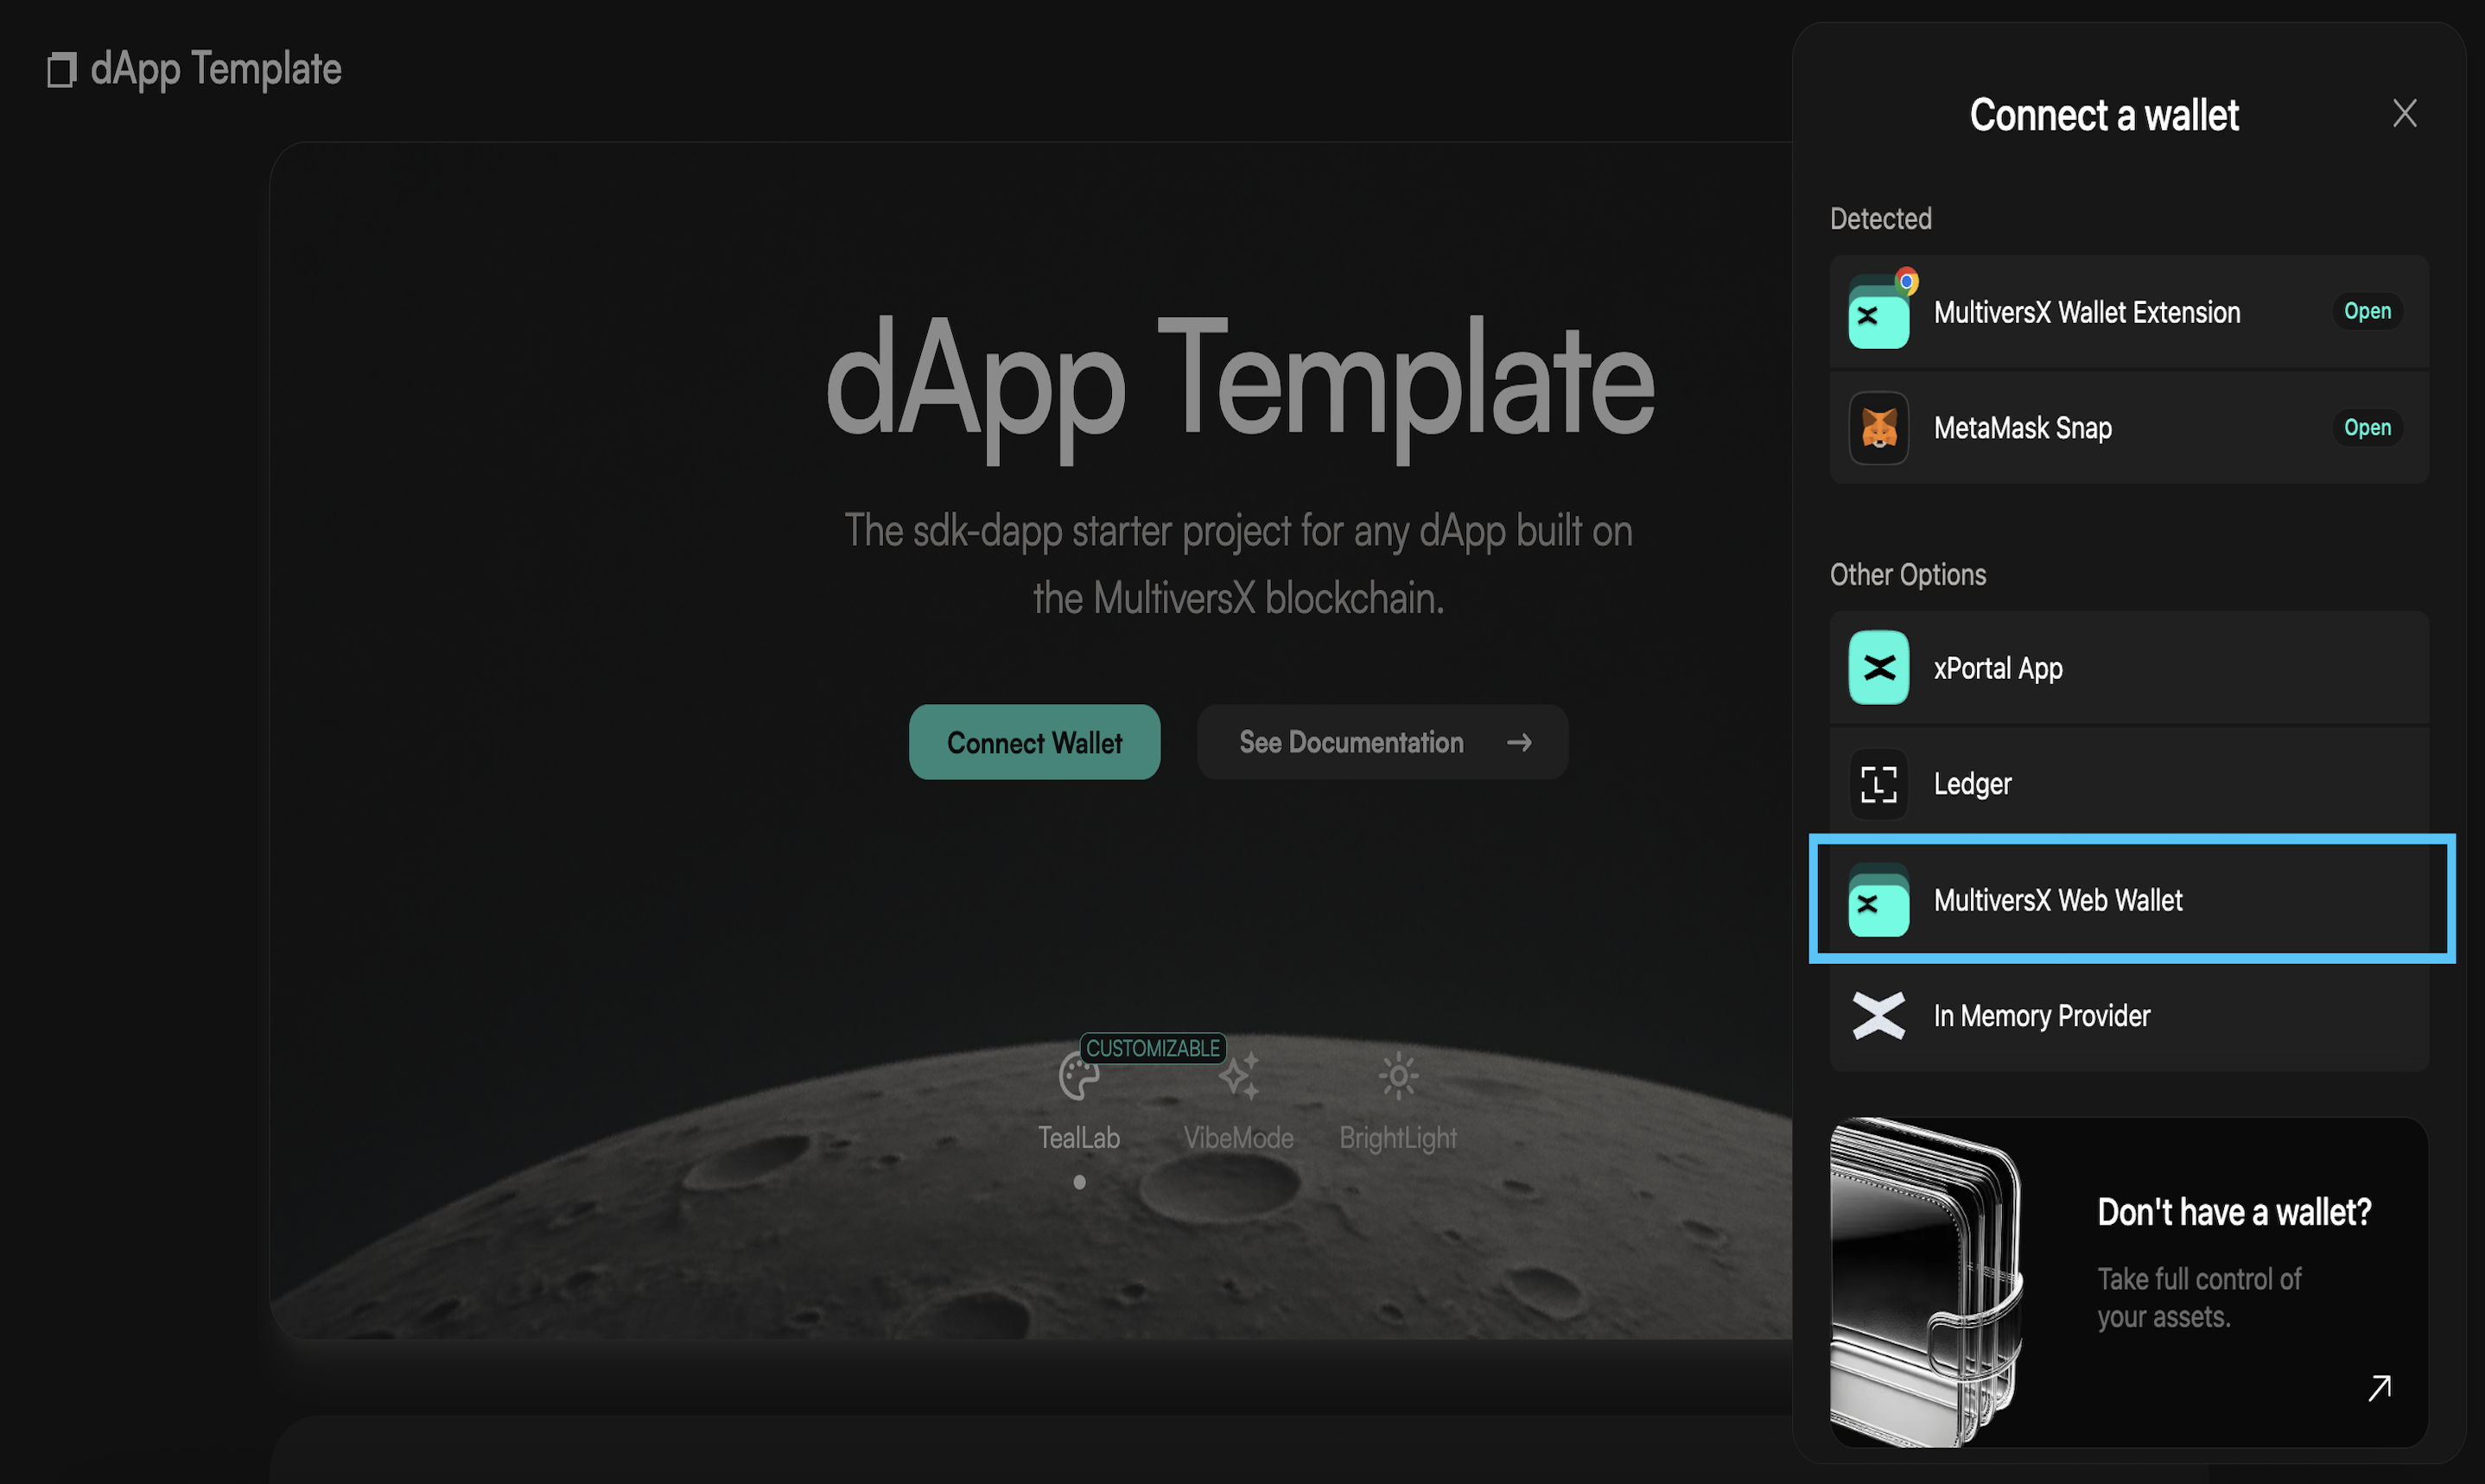
You will log in using the wallet created previously.
To do this, you will press Connect button and then choose MultiversX Web Wallet option.
After you access Web Wallet connection, you will be forwarded to login on Multiversx Wallet.
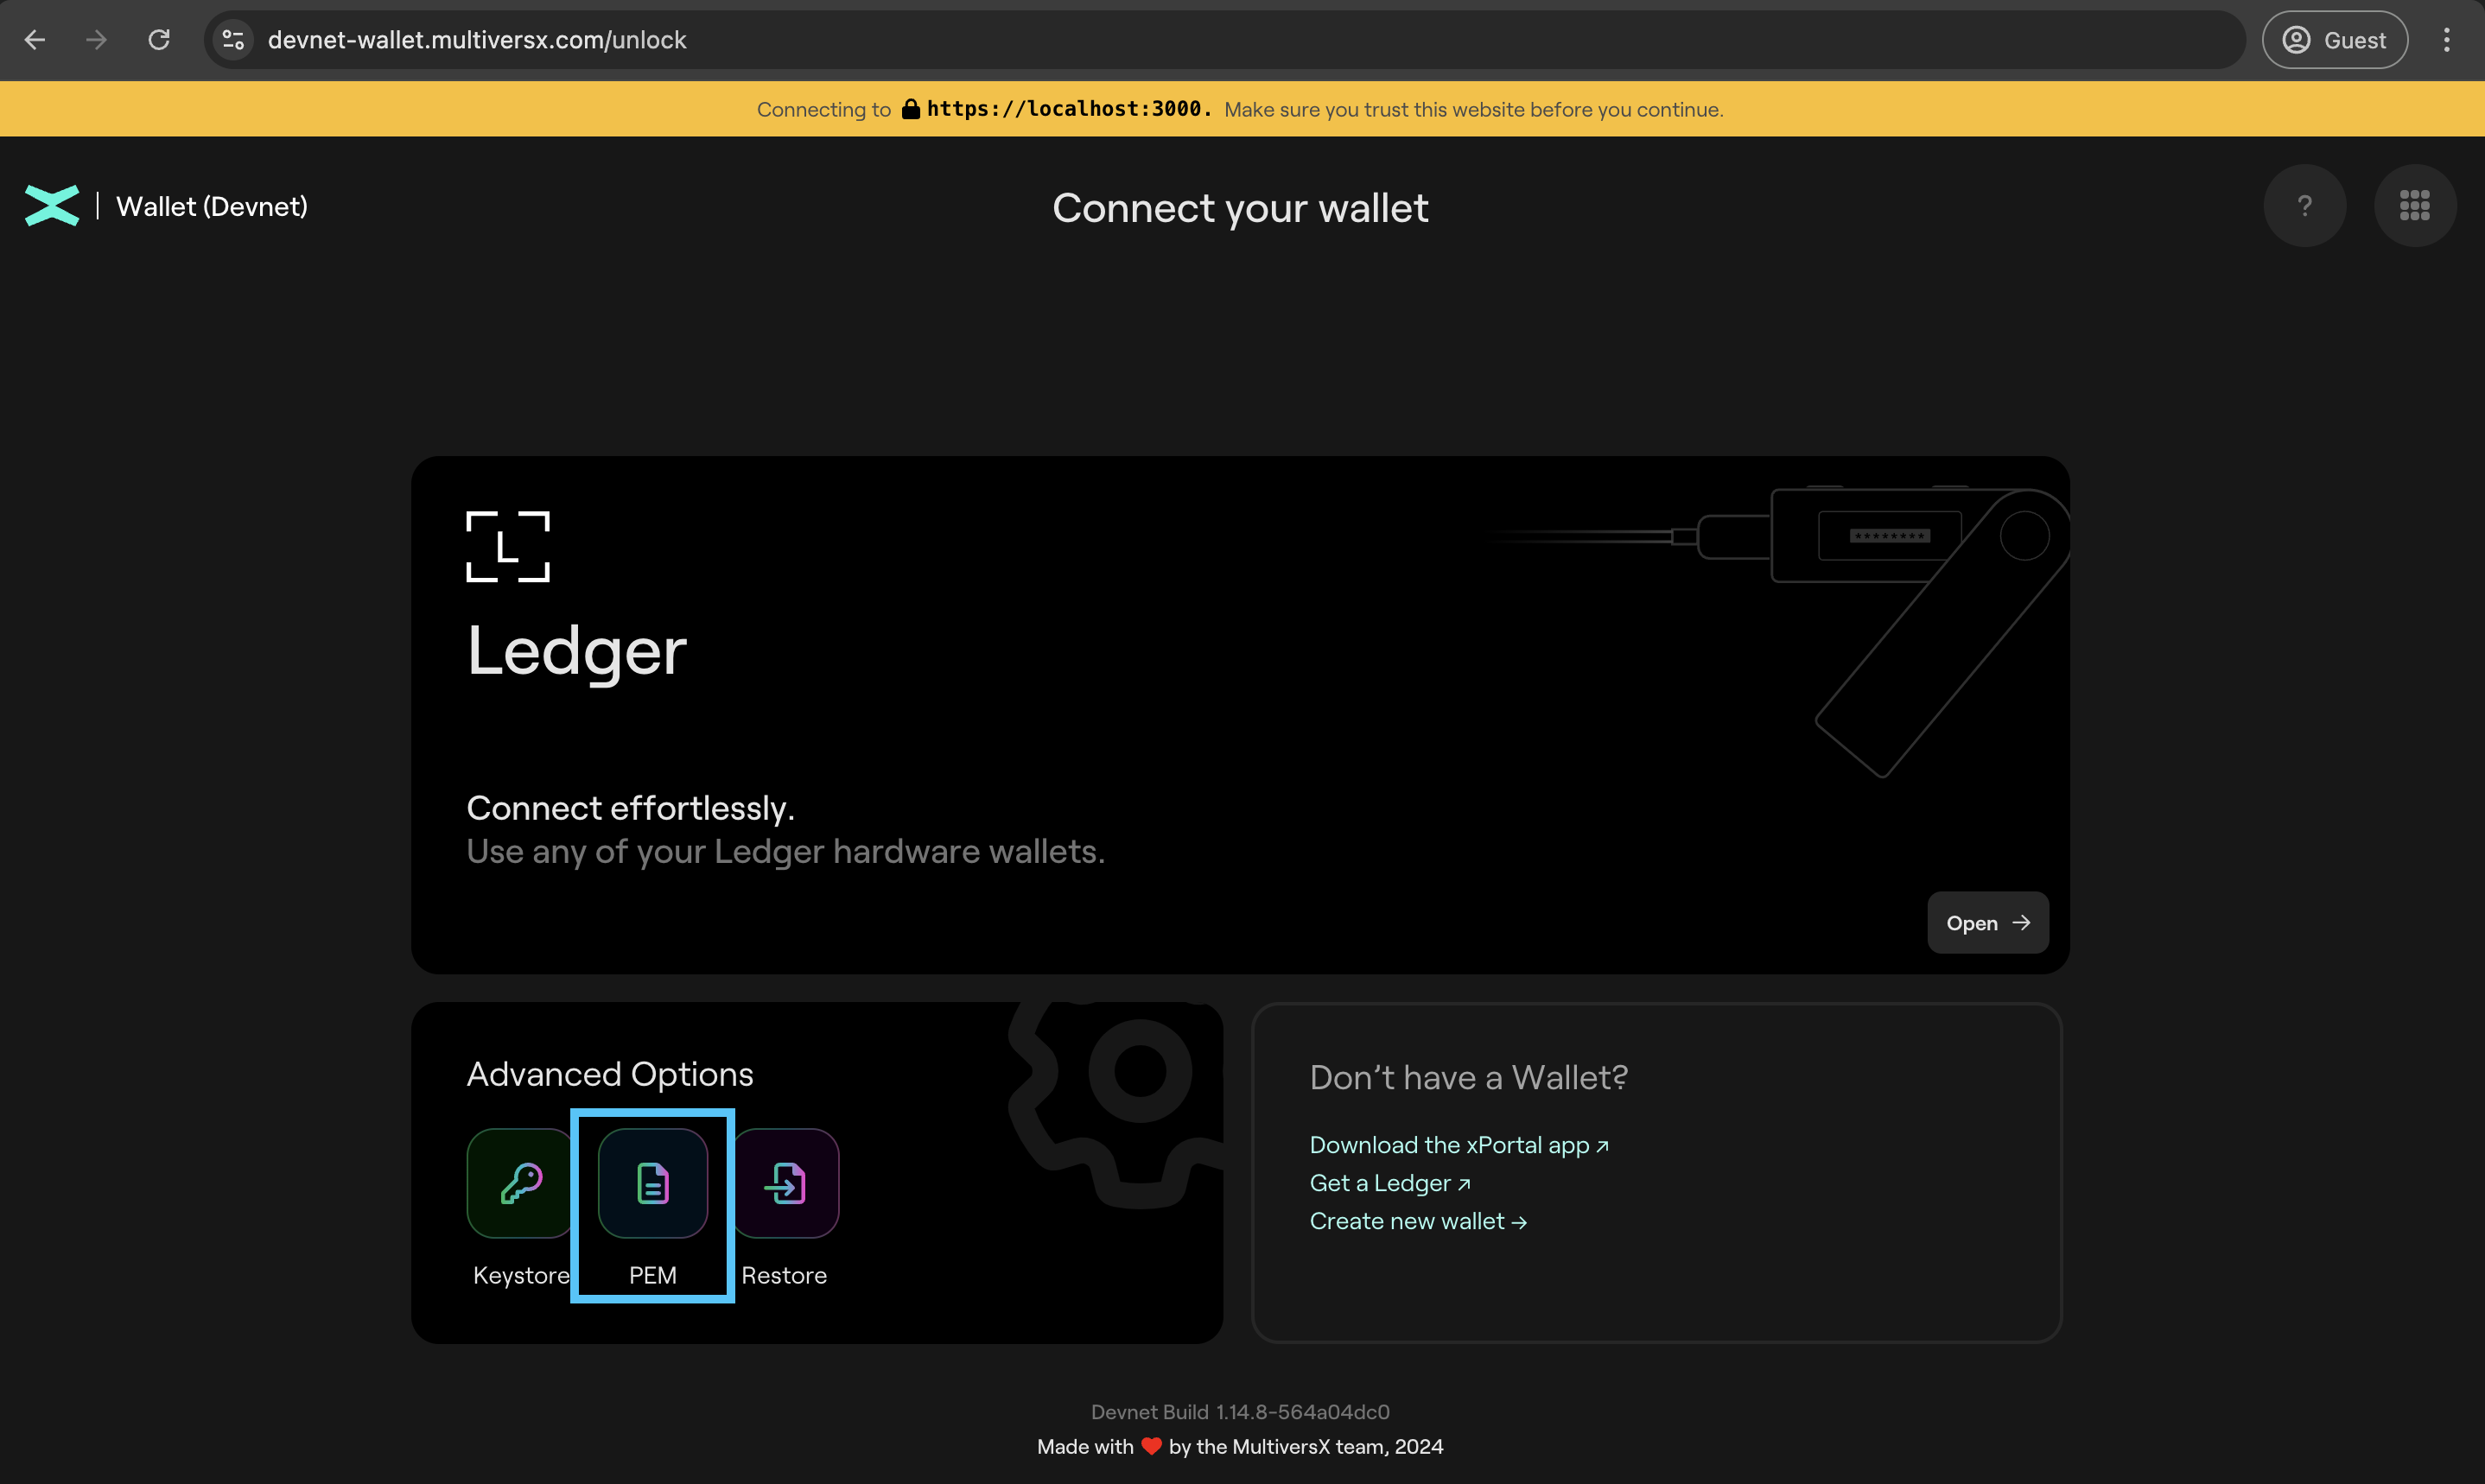
You will choose PEM option to login.
Ping Feature
After signing in, you will be directed to the dashboard where the Ping button will be visible.
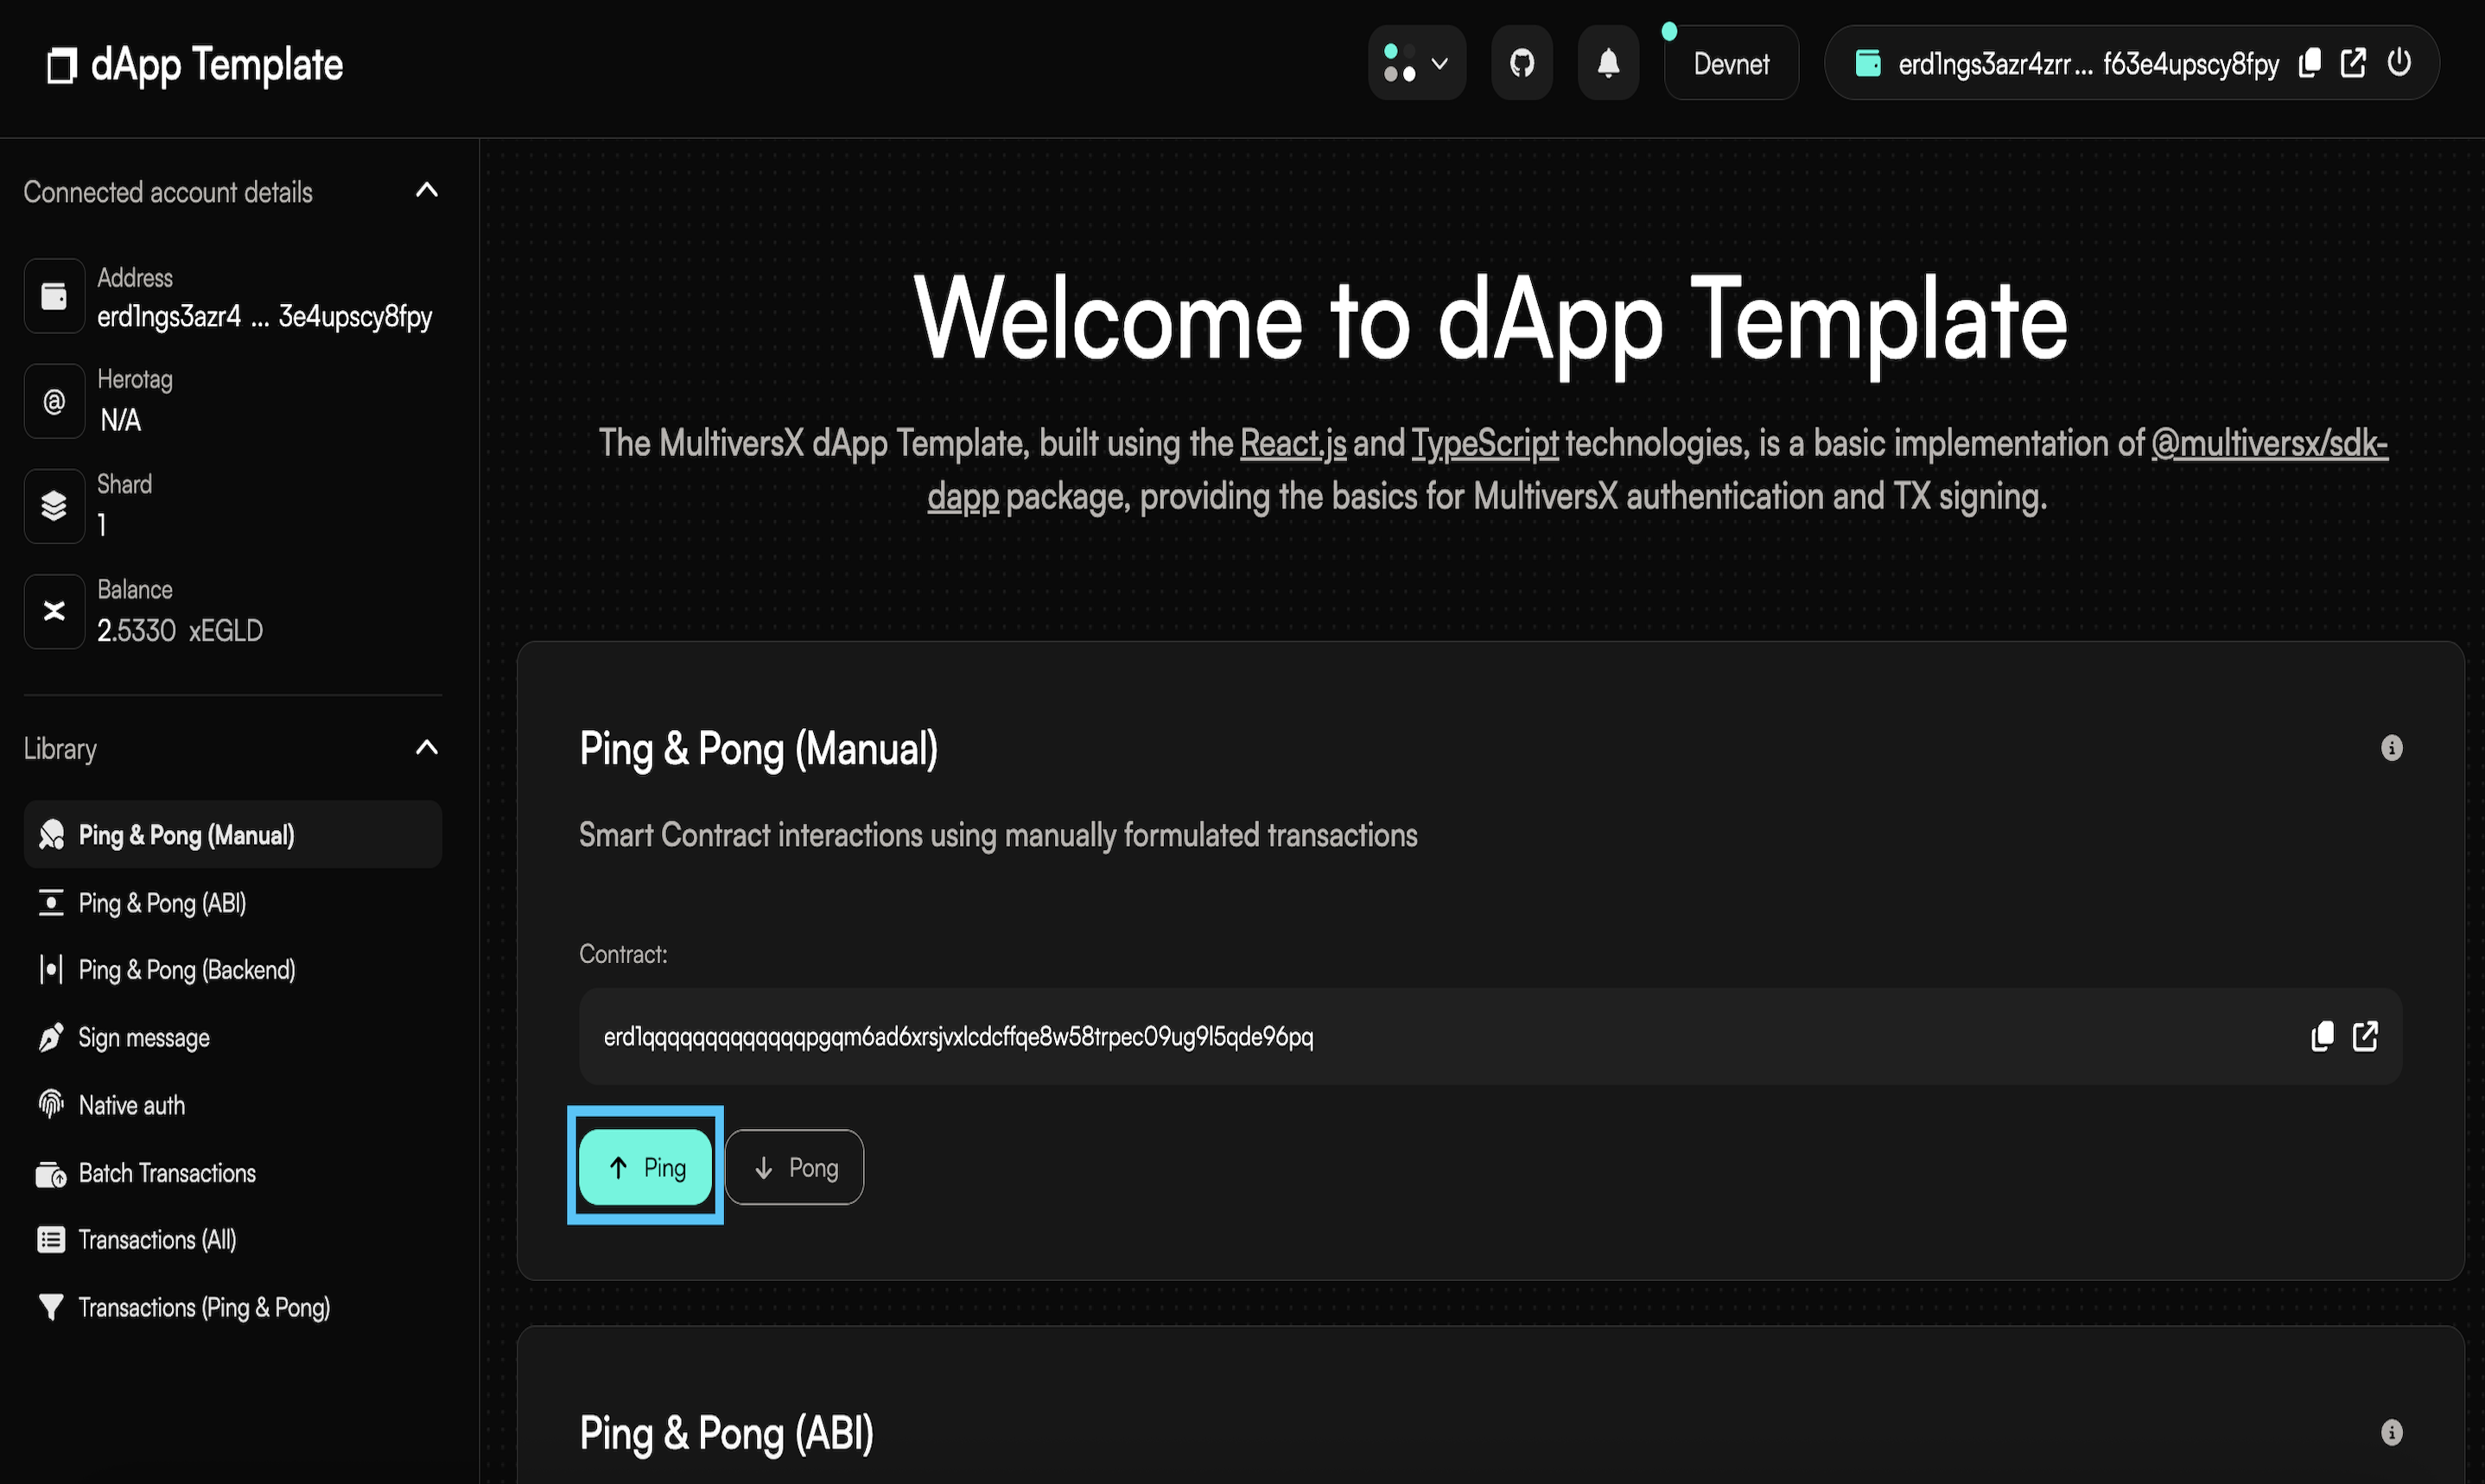
Click the Ping button and you will be redirected to the authentication page on the web wallet.
A new transaction will be created, and you will be asked to confirm it. This transaction transfers the balance from your wallet to the smart contract address. Those funds will be locked for a specified period of time. Pay attention to the data field, where you call the smart contract function ping.
After you confirm the transaction, a success message will appear and the funds are locked. You can view the transaction shown in the image here.
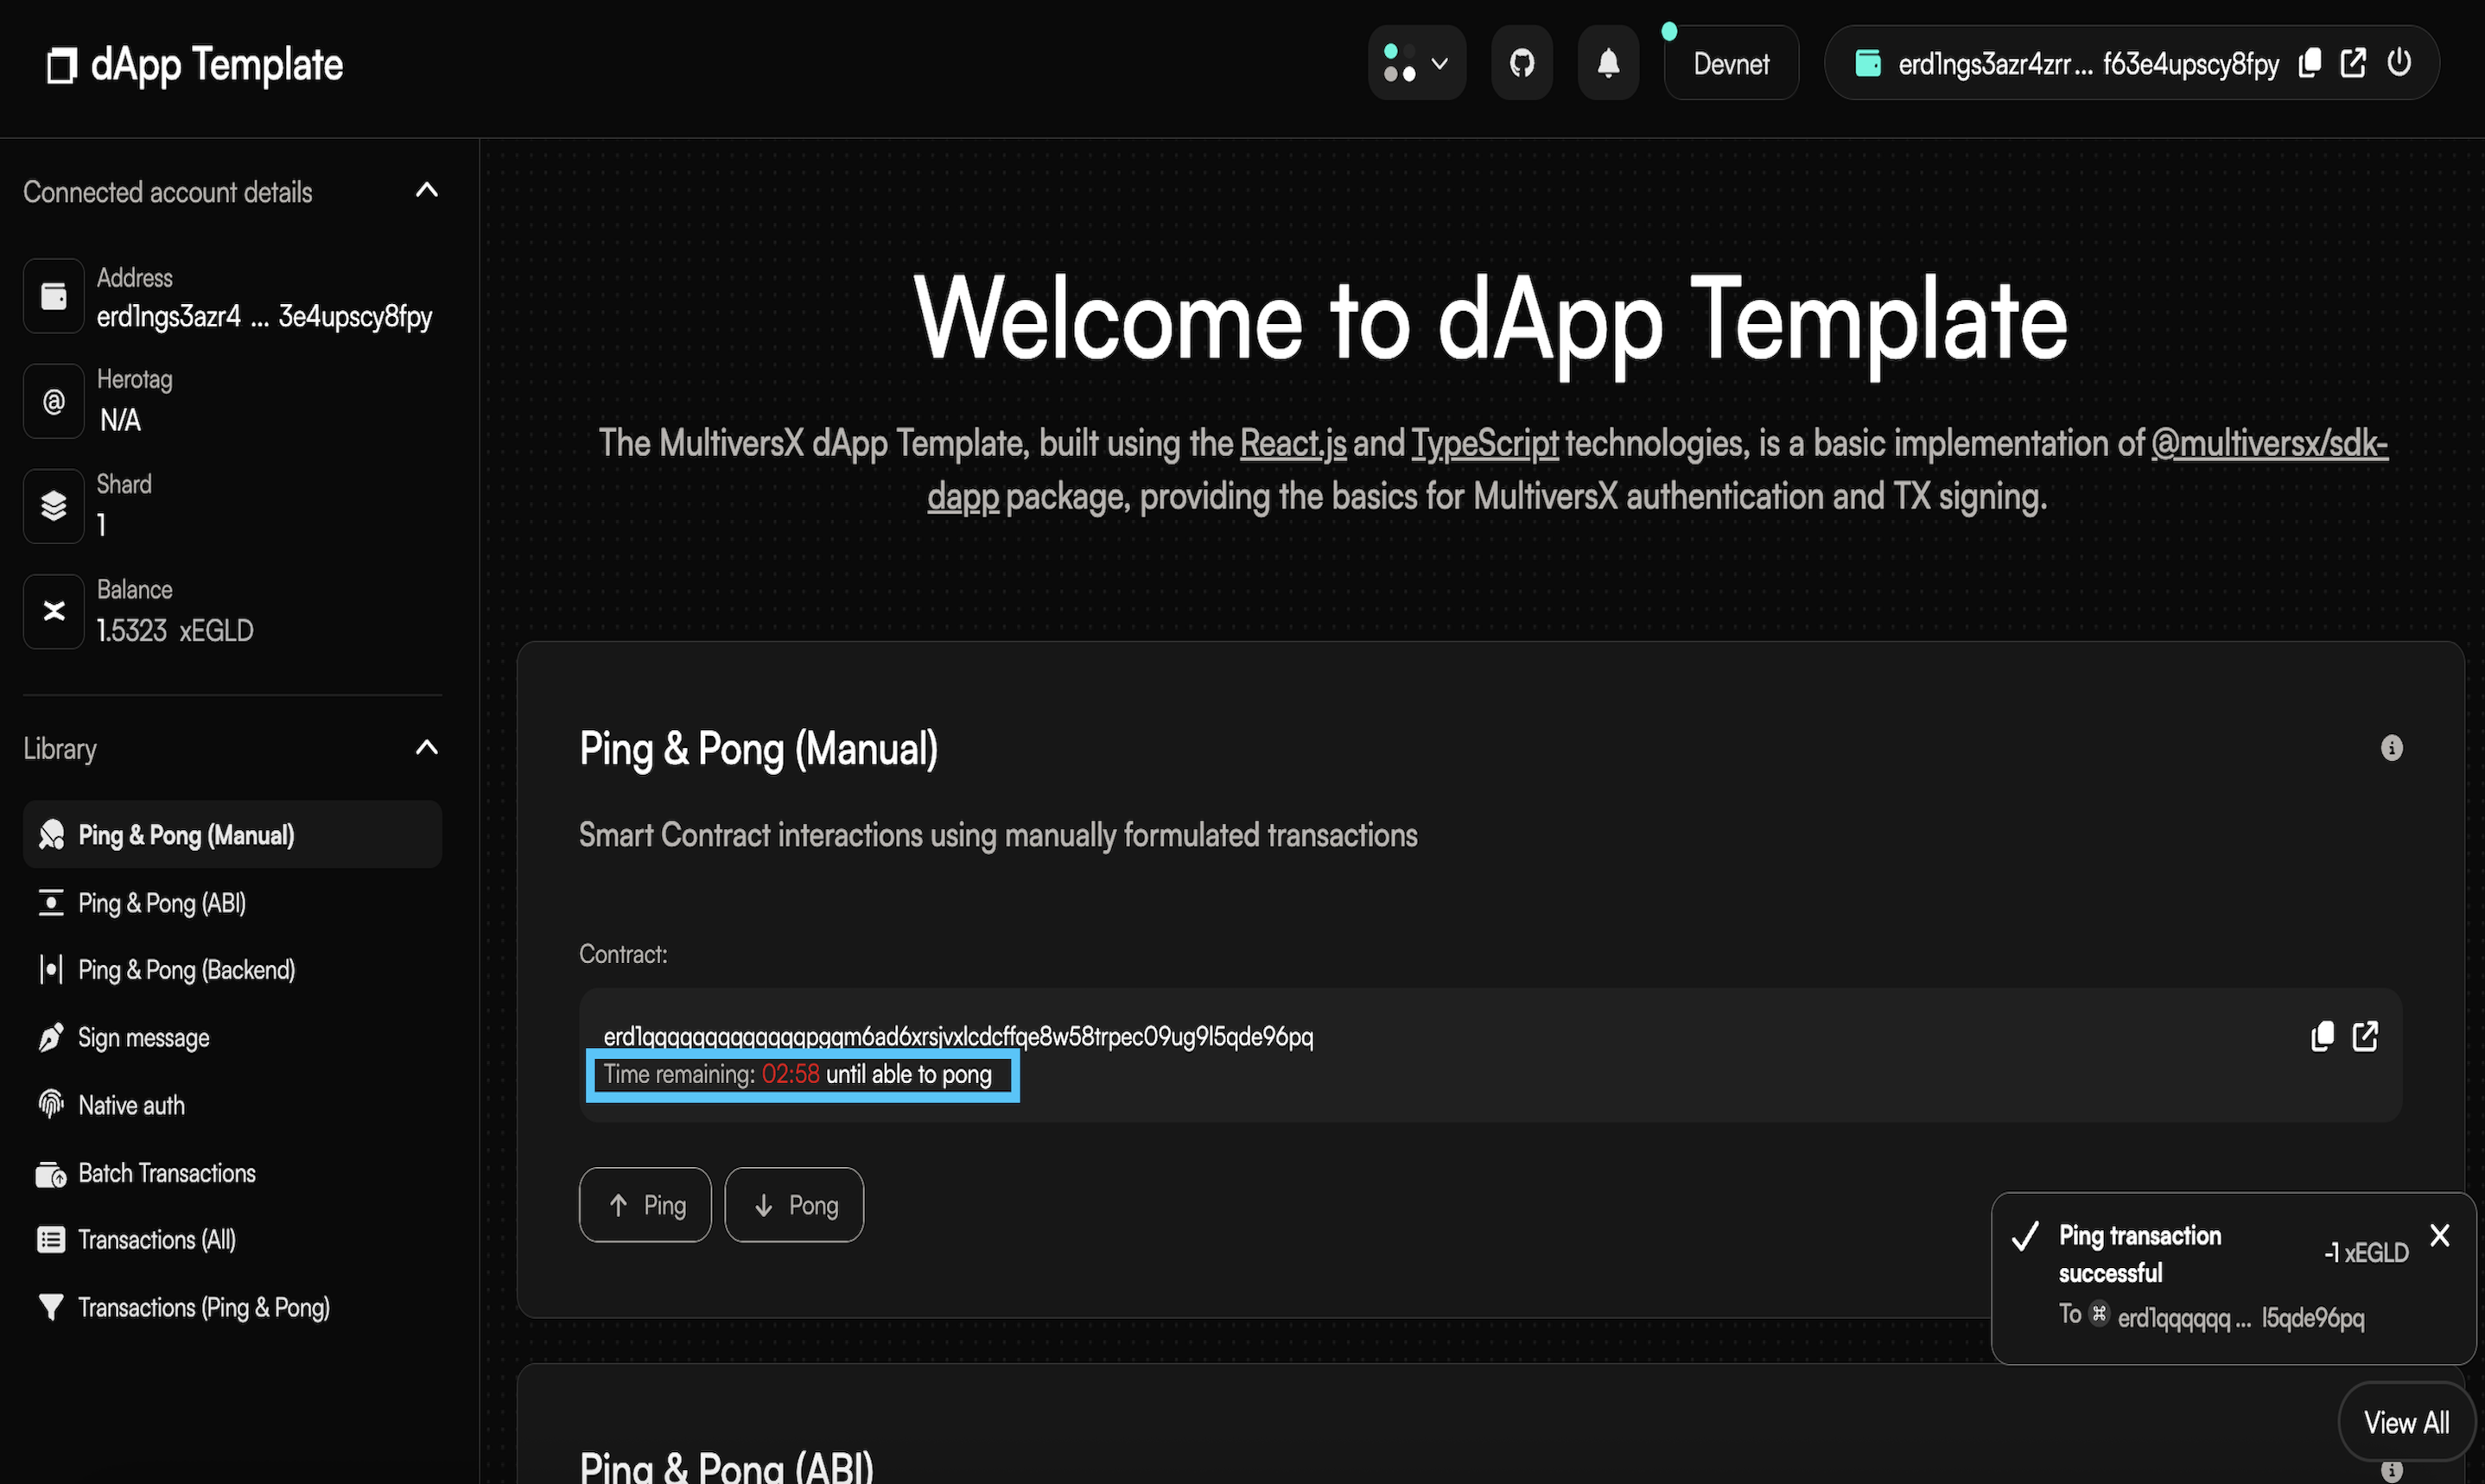 You can see the amount of time you will have to wait until you can Pong.
Pong Feature
After the time interval has passed, you can claim the funds by clicking the Pong button.
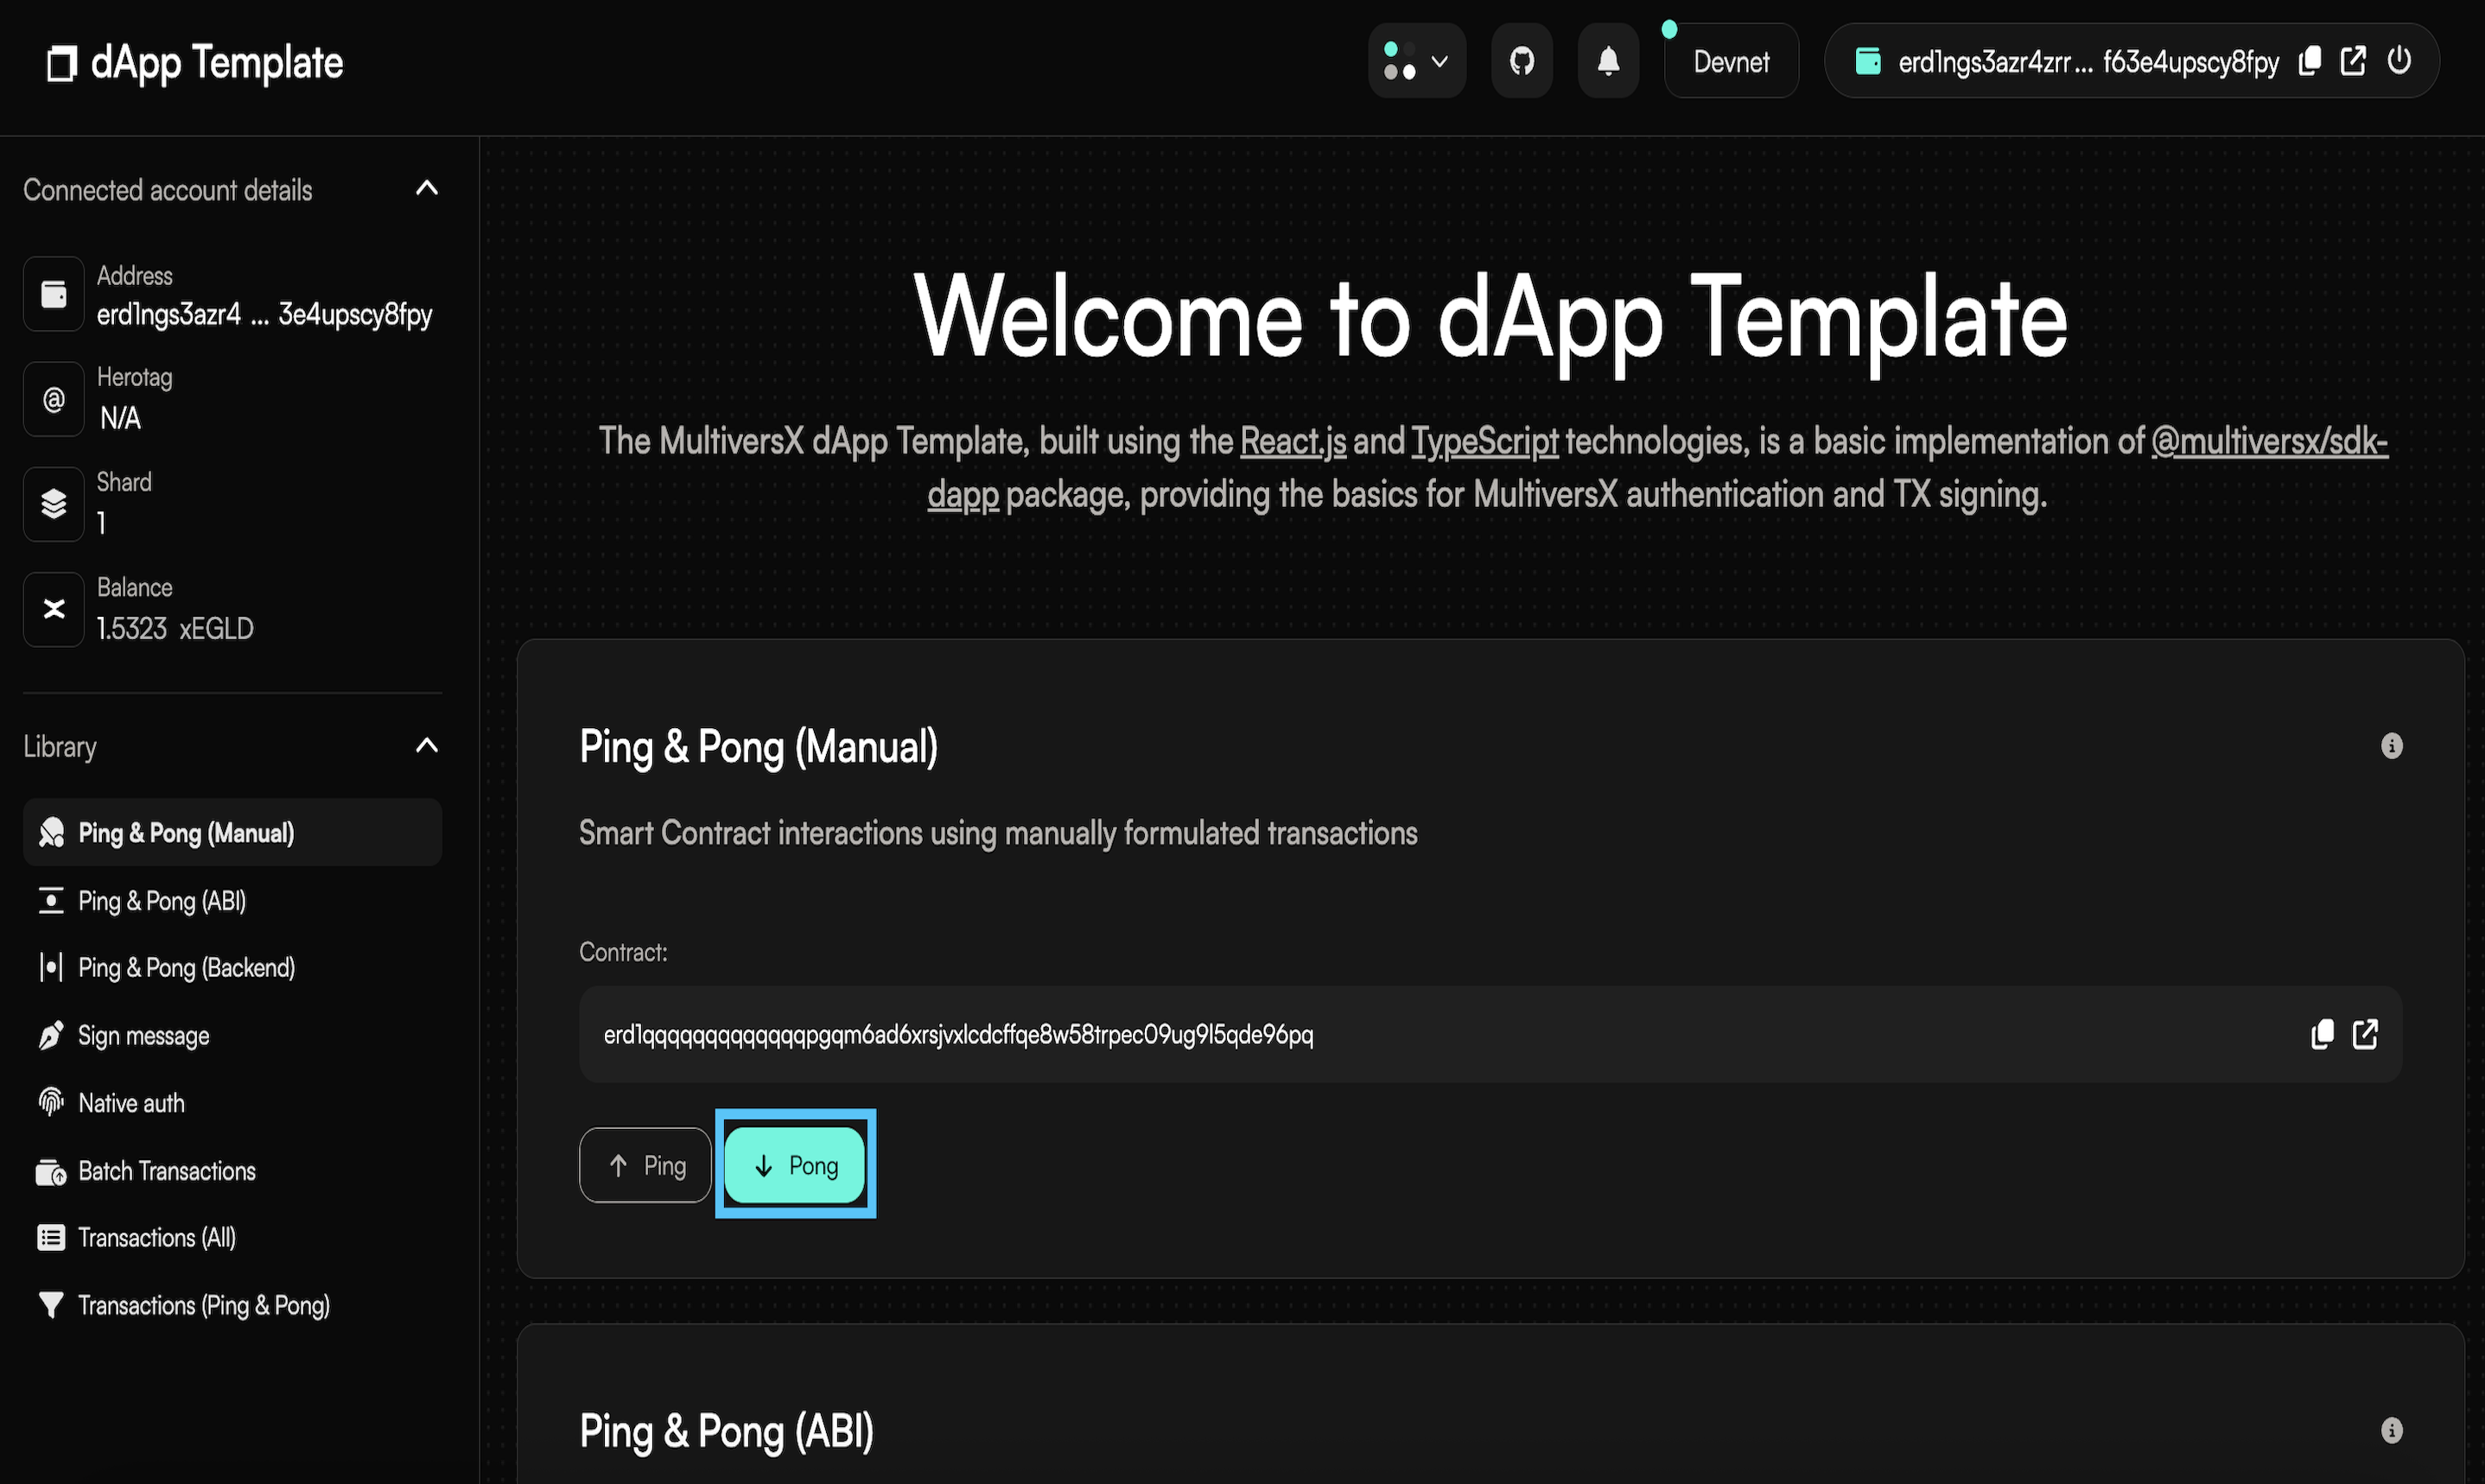
Another blockchain transaction will wait to be processed and again you will be asked to confirm it. This time the amount will be zero, as you only have to invoke the pong function (specified in the data field).
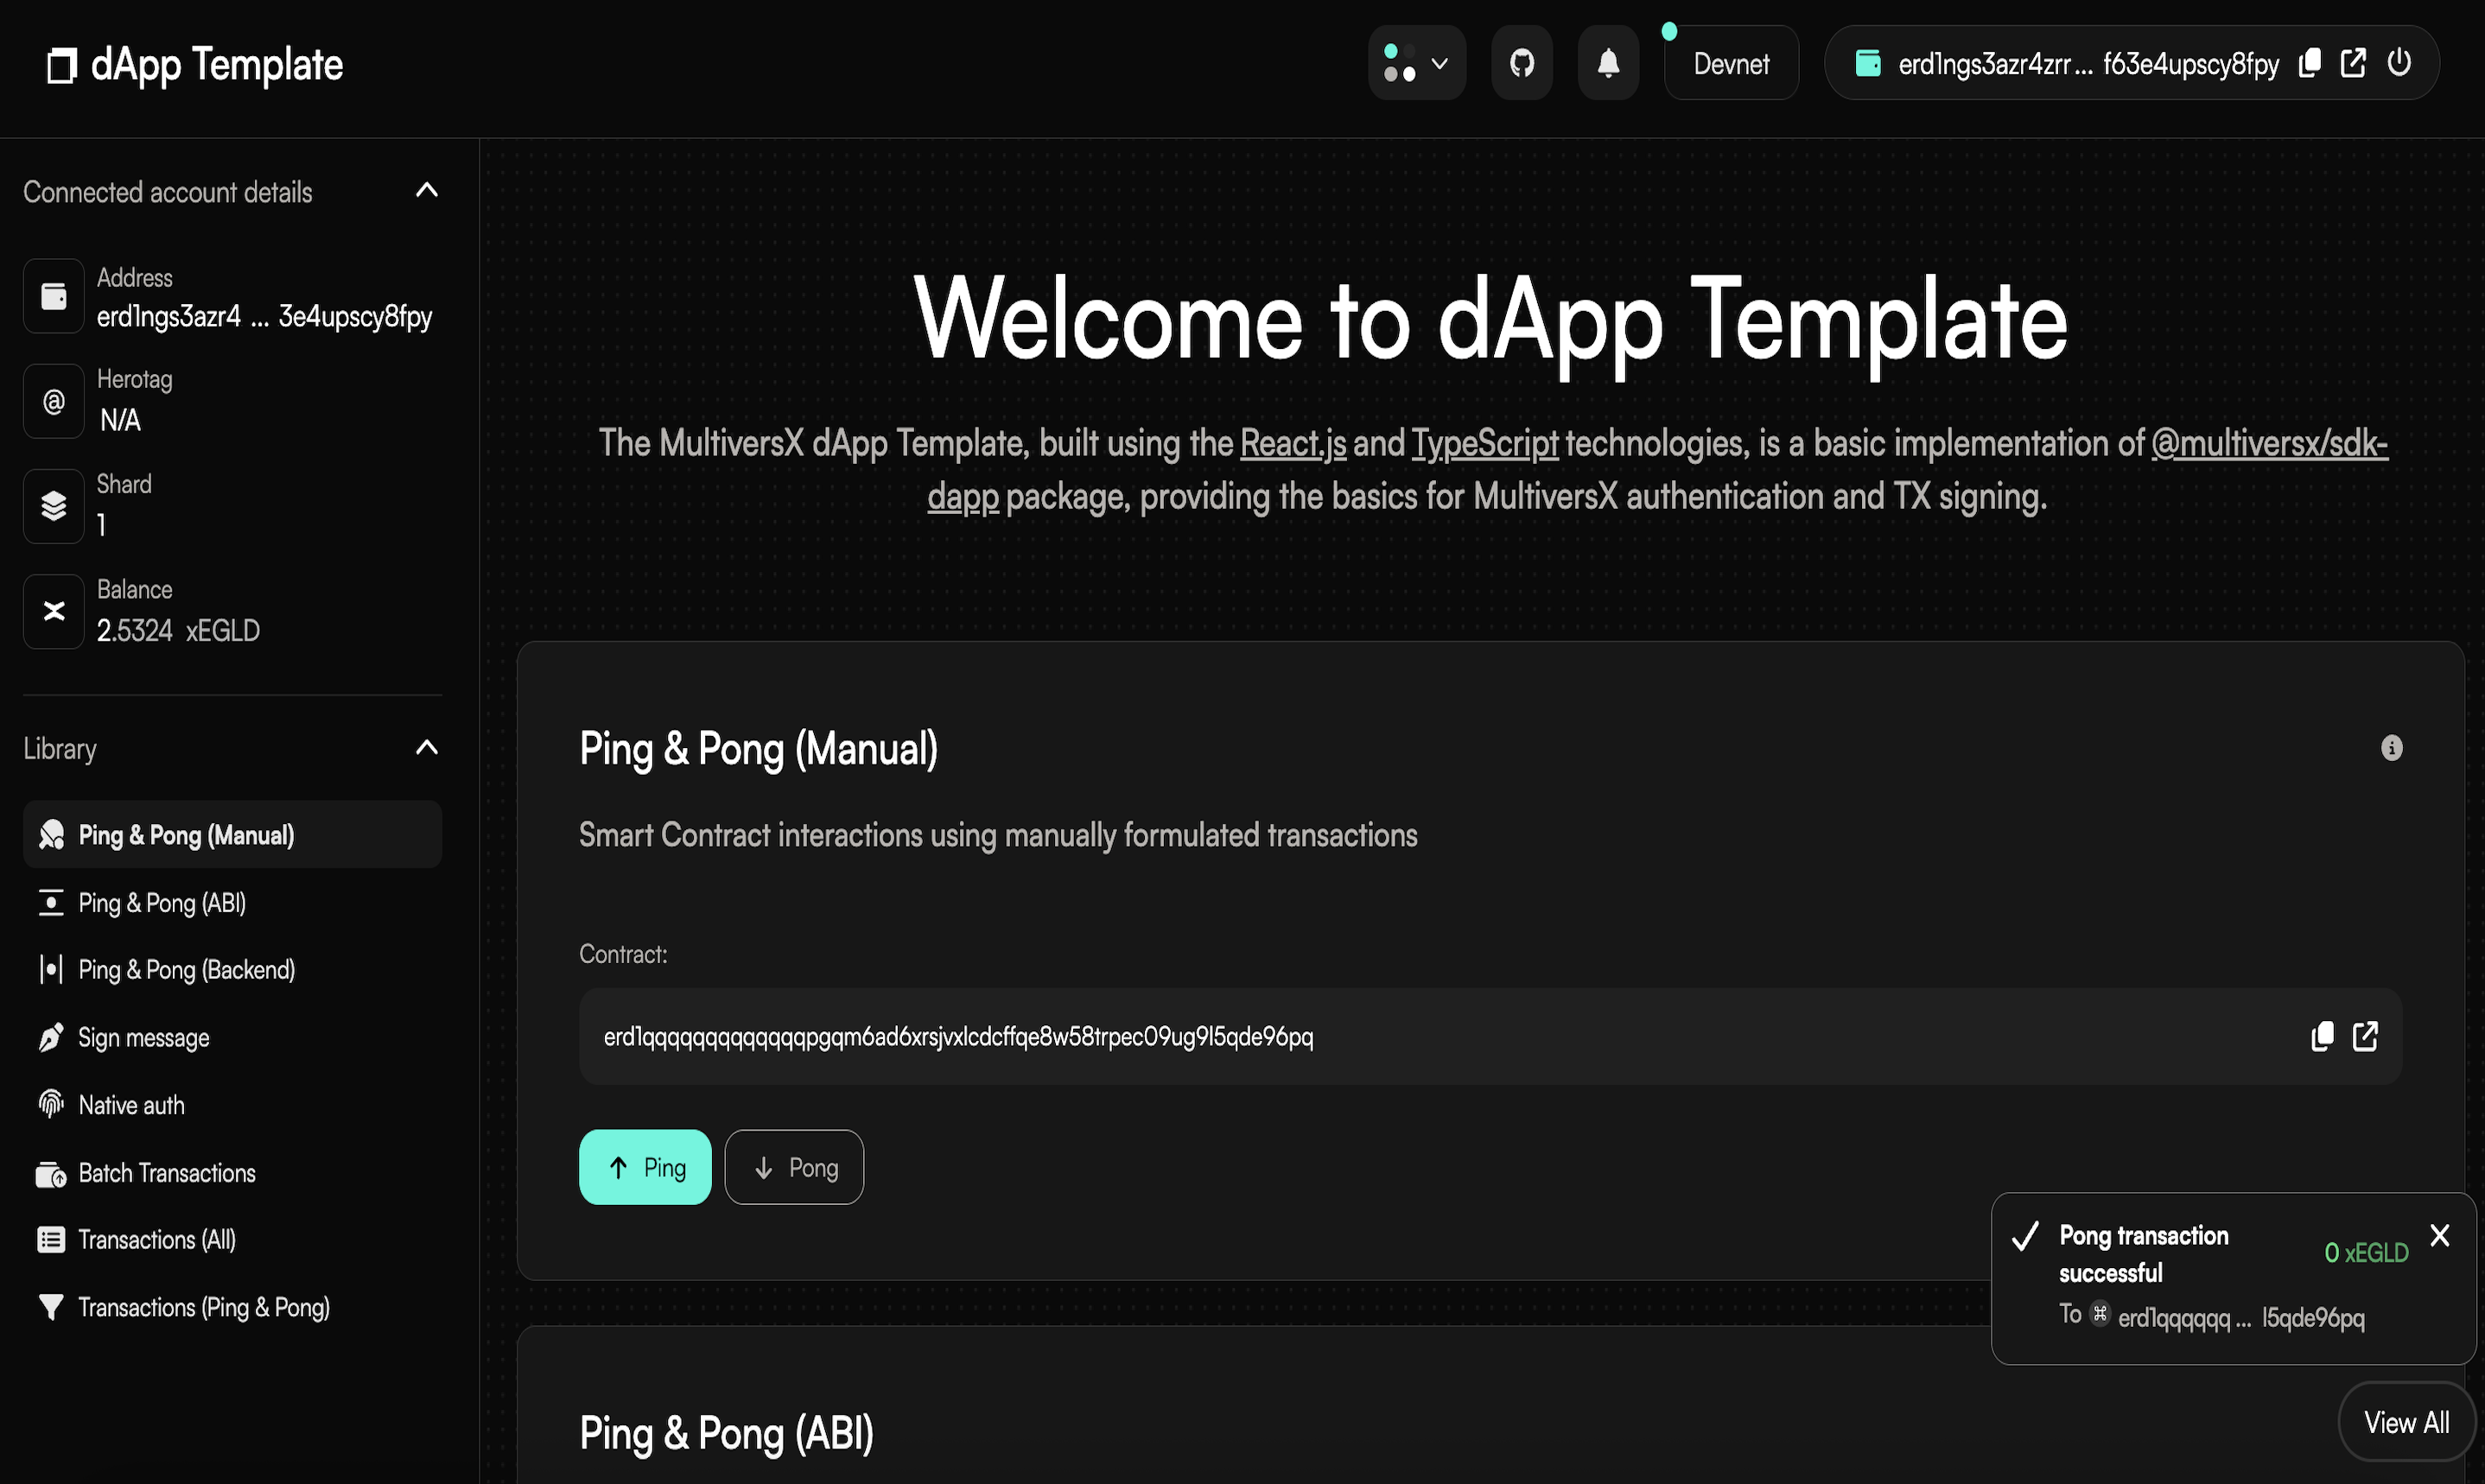
Once the transaction is complete, a success message will appear, and your funds will be returned to your wallet. You can view the transaction shown in the image here.
Where to go next?
The purpose of this guide is to provide a starting point for you to discover the MultiversX technology capabilities and devkit. Keep reading the next docs to dive in deeper.
We welcome your questions and inquiries on Stack Overflow: https://stackoverflow.com/questions/tagged/multiversx.
Dive into more advanced topics and discover how to extend the smart contract, customize the wallet, and leverage MultiversX tools here: https://docs.multiversx.com.